Friday, February 26, 2010

Coming Soon...Martha Mondays

I just got this book, Martha Stewart's Cupcakes: 175 Inspired Ideas for Everyone's Favorite Treat !!

 Martha Stewart's Cupcakes: 175 Inspired Ideas for Everyone's Favorite Treat

Yummy!!!!

On the first Monday of the month, I will post a different cupcake from the book that I have made. Oh I can't wait!!

Friday, February 19, 2010

Eat This Not That....WOW!!

I know alot of us have a weight loss goal or a goal to get our families healthier. I love this book Eat This Not That!

but check out this oneCook This, Not That!: Kitchen Survival Guide. I am gonna have to pick that up.

Eat This Not That now has an iphone app.  Oh yea baby! If you have never checked out these books here are two helpful links to see what it is all about. They are little slide shows. For sure check these out!! It is amazing what you think is healthy and what is not healthy. Guess what is on the healthiest list... Chipotle...that's right! YUM well minus the beef ;)

The 20-Worst-Restaurant-Foods-America

20-Best-Restaurant-Foods-America

Have an awesome day! We are heading to disney. Where we pack our own food for sure...yikes is all I have to say about the health factor there...but it also saves a TON of money too. We do splurge on ice cream for kiddos (and hubbie LOL) though ;)

Eat This Not That Home

Wednesday, February 17, 2010

Yummy Thai Chicken Pasta

Tonight we are having Thai Chicken Pasta. I got the original recipe from Laura, a fellow playgroup mom. I have made a few changes though.


Thai Chicken Pasta

1 lb boneless skinless chicken breasts
3/4 to 1 cup Light Asian Toasted Sesame Dressing (Kraft)
2 tbsp Peanut Butter
2 tbsp honey
2 tbsp low sodium soy sauce
1/2 tsp crushed red pepper flakes (optional)
vegetables (julienne red bell pepper, julienne carrots, snow peas)
2 tbsp olive oil
8 oz linguine pasta

1) Option 1: Cut chicken into strips. Marinate chicken in 1/4 cup dressing for 30 minutes. Then, cook chicken in a nonstick skillet until done. Option 2 (my fav): Cook chicken breasts in crock pot on low for at least 4 hours until tender with 1/4 to 1/2 cup dressing. Remove chicken, discard sauce and cut into strips.
2) Mix 1/2 cup dressing, peanut butter, honey and soy sauce in small bowl.
3)  Cook pasta according to box directions and drain.
4) In pasta pot, add olive oil and cook vegetables over medium high for 3-5 minutes while stirring until tender crisp.
5) Add pasta back to pot and pour in sauce. Toss to combine. Enjoy!!

Friday, February 12, 2010

The Twins Make Valentine's Cake Hearts and Cupcake Bites!

We love cupcakes in this house!

We made Bakerella 's cupcake bites and cake balls into hearts. It was very fun and easy! And the best part
they taste sooooo good!!!


We chose to go with red velvet cake to keep with the whole Valentine's theme but any flavor works. You can use your own recipe or box mix. We went with a box mix this time. You also will need some cream cheese frosting again either your own recipe or a can of frosting.

We baked the cake according to directions in 13x9 baking dish. Allow to completely cool!

Next, crumble cooled cake into a large bowl and add entire can of frosting. This is the fun part! Use your hands to incorporate the frosting into the crumbled cake.


Line a cookie sheet with parchment paper and make little balls of cake (1.5"-1.75' diameter) with your hands. Place them on cookie sheet. Stick cookie sheet in the freezer (~15 min).


Use a small heart shaped cookie cutter to form the cake hearts. We used Wilton Heart Cut Outs to make our heart shapes.

Take each ball flatten slightly with palm of your hand and cut out with cutter.


The top may need to be trimmed with a knife.


You will end up with these cute little hearts.


Place them back on your parchment lined cookie sheet and put in freezer (~15min) while you are melting your candy coating or chocolate.

We used Merckens Coco Lite  and  Pink Candy Coatings for dipping the hearts.

To melt candy coating, place a small amount of candy coating wafers in small microwave proof bowl. I have found this 2 cup Pyrex Dish works really good for melting and dipping. Microwave candy coating for 1 minute at 50% power (or defrost). Stir and microwave in 30 second intervals at 50% power until melted. I usually add Paramount Crystals to thin the candy coating to make dipping easier.

Take a few hearts out of freezer at a time. Dip the hearts into melted candy coating with a fork and allow excess candy to drip off into the bowl. Tapping the fork on the edge of the bowl helps to remove excess candy coating. Place on parchment lined cookie sheet and allow to set. We decorated some hearts with Wilton Valentine Nonpareils Sprinkles before candy coating set. We also decorated some with drizzles of candy coating in another color after primary coat set. Sometimes you may need to dip a second time if you are using red velvet or chocolate cake.


We are planning to give these yummy treats to family and neighbors in a cute little hand made box. We will post that little craft later ;)

We also made cupcake bites following Bakerella's directions here for a Valentine's playdate.


Enjoy!!!

Tuesday, February 9, 2010

The Twins Make Strawberry Shortcake with Sweet Biscuits

The twins are at it again! They LOVE cooking and baking.

Strawberry Shortcake with Sweet Biscuits

Preheat your oven to 400 degrees F. In a mixing bowl, combine flour, salt,


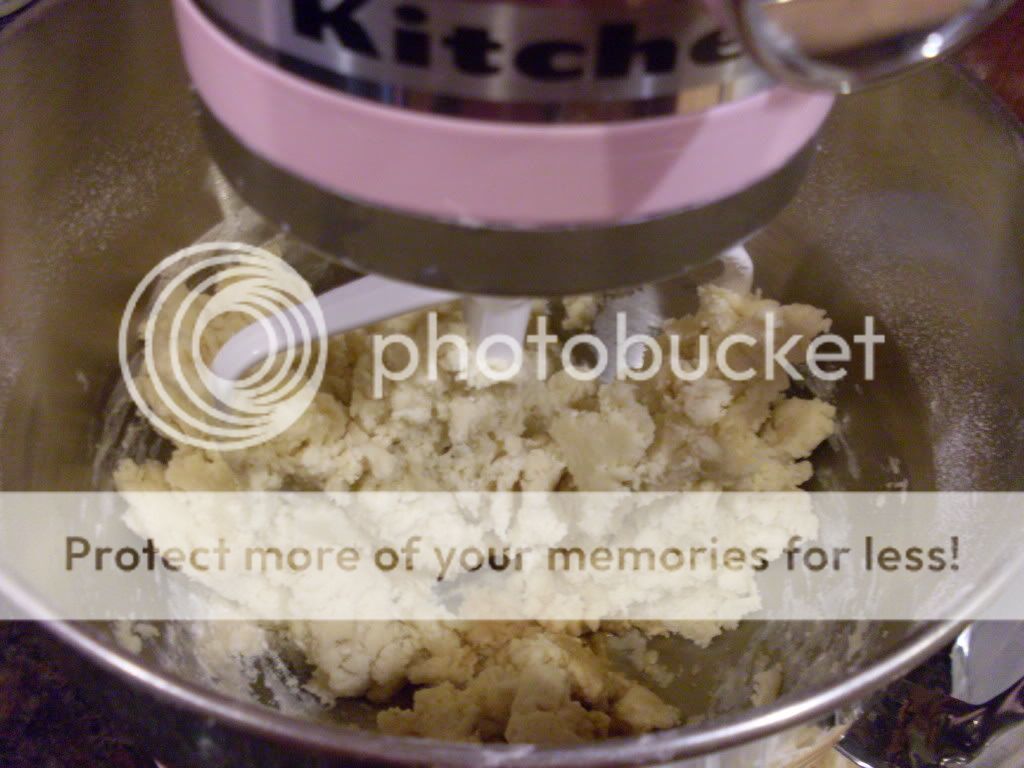
sugar, and baking powder. Then, add cold butter and cut into dry ingredients. We used a kitchen aid stand mixer with flat beater on speed 2 to cut in butter until butter is the size of peas.


Add milk (or cream) and vanilla. Mix until just combined. Batter will be sticky.

Knead dough briefly on floured surface with floured hands approx 6-8 turns.


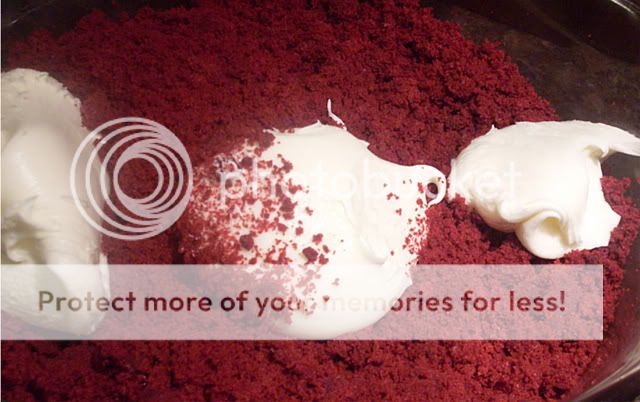
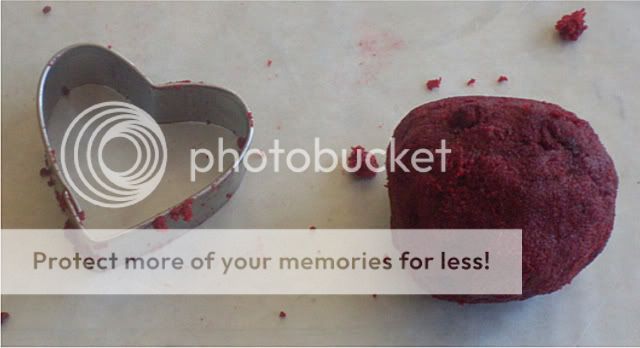
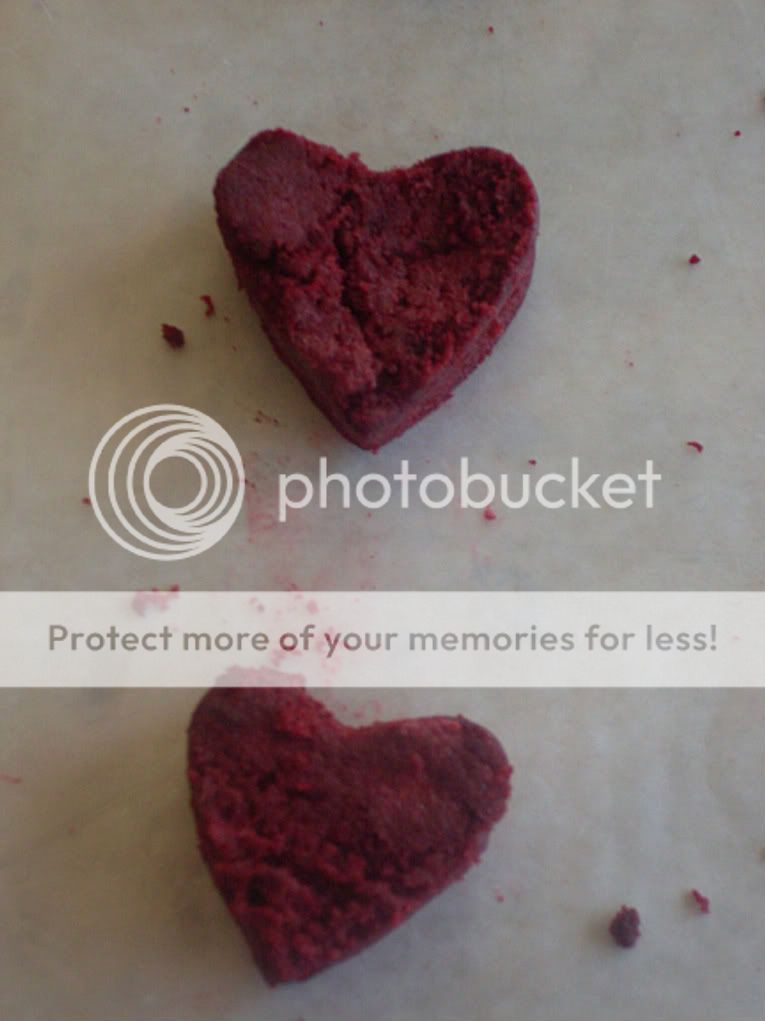
Form into medium sized round biscuits for rustic appearance. Or flatten dough on floured surface to 1'' thick and cut with biscuit cutter or drinking glass. **USE A HEART COOKIE CUTTER FOR VALENTINE'S DAY!!!  And pop in the oven! (Nice cookie sheet...I know...can you tell it gets alot of use LOL)


Rinse the strawberries and allow to drain.


Cut stems off and slice strawberries into quarters. The twins use a serrated plastic knife to do this. Place in bowl and gently combine with sugar.


Let strawberries rest while you whip the cream. We used a kitchen aid stand mixer with wire whip and gradually increased speed to 8 until sharp peaks were formed. Don't forget to add sugar and vanilla after cream begins to thicken a bit.


**Optional: Throw some of the sugared strawberries in a mini food processor or use potato masher and puree. This will give a nice puree to drip on your biscuits.

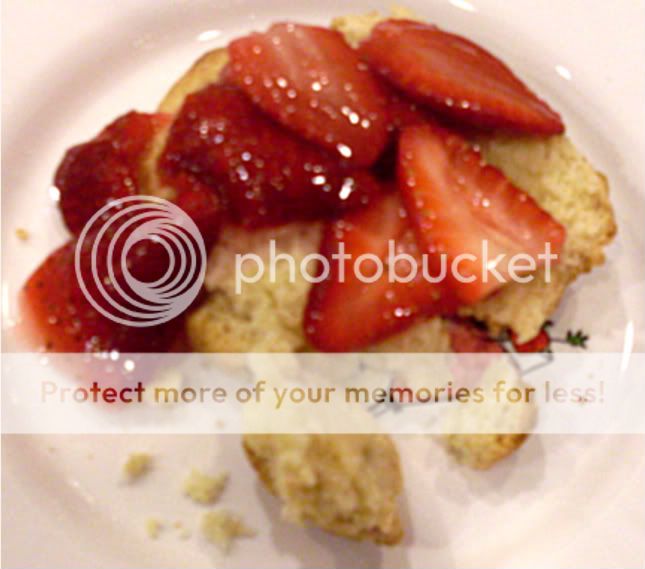
After you have allowed your biscuits to cool for a few minutes, slice them in half, drizzle with strawberry puree and place some sugared strawberries on top.


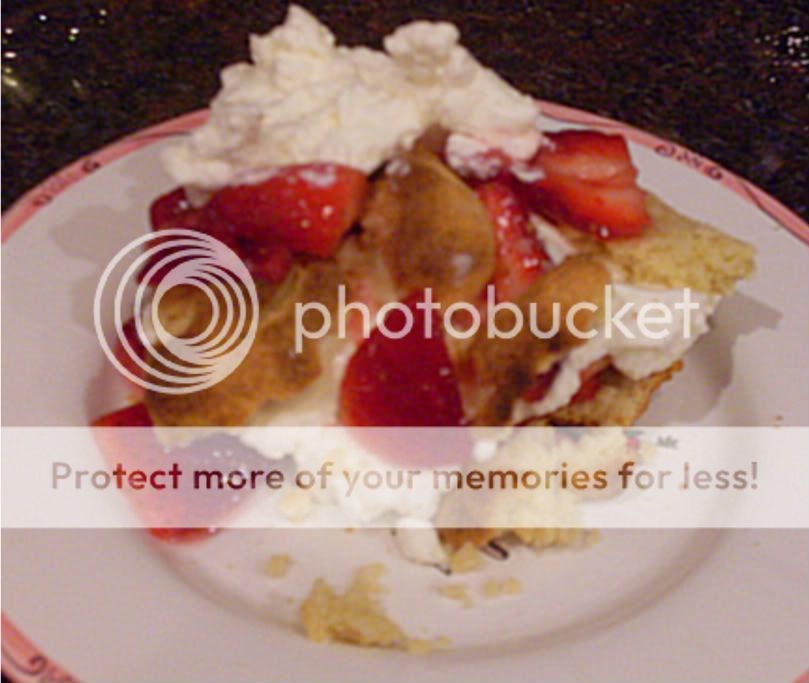
Slap on some whipped cream, top with biscuit and repeat process.


ENJOY!!!!

Strawberry Shortcake with Sweet Biscuits

Sweet Biscuits

2 cups flour
1 tsp salt
1 tbsp baking powder
2/3 cup sugar (powdered sugar preferred)
1 stick cold unsalted butter
3/4 cup milk (or cream)
1 tsp pure vanilla extract

1) Preheat oven to 400 degrees F.
2) Combine dry ingredients in mixing bowl
3) Cut in butter until butter is size of peas.
4) Add milk (or cream) and vanilla and gently combine. Dough will be sticky.
5) Gently knead dough briefly on floured surface with floured hands approx 6-8 turns.
6) Form into medium sized round biscuits for rustic appearance -OR- flatten dough on floured surface to 1'' thick and cut with biscuit cutter or drinking glass.
**USE A HEART COOKIE CUTTER FOR VALENTINE'S DAY!!!
7) Bake approx 12-15 minutes depending on oven.

Topping - Strawberries

2-3 baskets fresh strawberries
1/2 cup granulated sugar

1) Rinse strawberries and allow to drain.
2) Cut stems off strawberries. Cut into quarters and place in large bowl.
3) Sprinkle strawberries with granulated sugar.
4) Gently combine strawberries with sugar.
5) Allow strawberries to rest for 10 minutes.
6) Optional: In a mini food processor or with potato masher, puree several strawberries to create a nice strawberry puree for drizzling over sweet biscuits.

Sweetened Whipped Cream
1 cup Heavy Cream

3-4 Tbsp Powdered Sugar
1 tsp Vanilla
1) In a chilled mixing bowl, add heavy cream.
2) Using electric mixer, beat cream until slightly thicken.
3) Add sugar and vanilla.
4) With mixer, beat cream until sharp peaks form. Careful not to over beat...we don't want butter ;)

Assembly

Sweet Biscuits
Strawberry Topping
Sweetened Whipped Cream

1) Cut biscuit in half. Place half on plate.
2) Drizzle biscuit with optional strawberry puree and strawberry topping.
3) Add a dallop of sweetened whipped cream.
4) Top with other half of biscuit.
5) Drizzle with optional strawberry puree and strawberry topping.
6) Add a dallop of sweetened whipped cream and ENJOY!

Saturday, February 6, 2010

Delicious Garlicky Chicken and Dutch Potatoes

We had this for dinner last night...YUM!!! Words cannot describe the garlicky deliciousness of this chicken and potatoes!!!

Delicious Garlicky Chicken and Baby Dutch Potatoes


Garlicky Chicken

1 whole chicken, cut up
1/3 cup extra virgin olive oil
30-40 cloves of garlic, peeled
10-15 fresh sprigs of thyme or rosemary
sea salt
fresh ground pepper

1) Preheat oven to 350 degrees F.
2) Rinse Chicken.
3) Season chicken with salt and pepper.

4) Heat Dutch oven over medium high heat.

5) Toss chicken in about 2-3 tbsp olive oil.
6) Lightly brown chicken in Dutch oven on both sides.
7) Add remaining extra virgin olive oil, herbs, and garlic.
8) Cover and bake for 1 1/2 hours.
9) Remove from oven and let rest for 5-10 minutes before serving.
(adapted from recipe by Alton Brown)


The meat just falls right off the bone. It is so moist and garlicky delicious!

***Tip: An easy way to peel garlic cloves is to use a chef's knife. Cut off the base of the garlic clove. Place clove, curved side up, under flat blade of chef's knife (the blade needs to be parallel with cutting board) on cutting board and use the heel of your hand gently slam the portion of the knife on top of the clove. The clove should slide right out of the skin. This also helps relieve some frustration at the same time :)

Baby Dutch Potatoes


1 1/2 lb baby Dutch potatoes
1/3 cup extra virgin olive oil
10-15 springs of thyme or rosemary
10 cloves of garlic, peeled
1/2 tbsp - 1 tbsp coarse sea salt (to taste)
fresh ground black pepper to taste

1) Preheat oven to 350 degree F.
2) Scrub potatoes.
3) In 2.5 quart round dish with lid, add potatoes.
4) Toss potatoes with olive oil to coat.
5) Toss potatoes with sea salt and pepper to taste.
6) Add garlic clove and rosemary or thyme sprigs.
7) Cover and bake for 30 minutes.
8) Stir potatoes and bake another 30 minutes.
9) Serve with garlicky chicken.


**After chicken has been in the oven for 30 minutes, put potatoes in there too. Both will be done at the same time.

Friday, February 5, 2010

Mega Swag Bucks Day Today!!

I just recently joined swagbucks. This is awesome. You just use swagbucks.com to search instead of another search engine. Then, you earn swagbucks (points) for just searching to buy stuff! And they have some good stuff!!

Check it out!!! Today is Mega Swagbucks Day meaning you can win anywhere from $1 to $500 for just searching!

CLICK HERE
Search & Win

You earn swagbucks for just joining! How can you go wrong!

Wednesday, February 3, 2010

Vietnamese Spring Rolls

One of our family favorites is Vietnamese Spring Rolls for the obvious reason because Fireman is Vietnamese and also that they are so tasty!!

They are very easy to make once you get the hang of the rolling part.

First, assemble all of your ingredients in the center of dining table.


Briefly dip Rice Paper in lukewarm water and allow excess water to drip off.


Place Rice Paper on your plate with a little hanging over the edge. You will need to grab this edge later...this is the easiest way...trust me!


Place 2-3 shrimp on rice paper closest to you. Place 1 lettuce leaf, veggies, meat and rice vermicelli on top. Careful not to put too much or it will be to fat to roll!


Beginning at the overhanging edge closest to you, carefully grasp the rice paper with both hands.


And fold the edge over on top and under your fillings to cover them.


Then carefully fold in both edges.


Tuck the edge under and gently roll away from you until you have a tight little roll.


Dip and Enjoy!!! Fireman prefers a fish sauce based dipping sauce (nuoc mam cham) and I prefer a hoisin based dipping sauce or even low sodium soy sauce works for me!

Vietnamese Spring Rolls

Chicken Breast (cooked and sliced thin)
Shrimp (shelled and cooked)
Spring Roll Wrappers-made from rice (Banh Trang)**
Rice Vermicelli (Rice Stick)**
Green Leaf Lettuce (rinsed and drained)
Fresh Cilantro
Bean Sprouts
Cucumber (peeled and sliced in thin strips)
Matchstick Carrots
1-2 Bowls of Lukewarm Water

~Optional:
Pork Loin (cooked and sliced very thin)
Egg (scrambled)
Fresh Mint Leaves
Garlic Chives
Avocado

**Available at Asian Supermarket

1. Boil rice vermicelli in water approx. 2-3 minutes, stiring occasionally.

2. Strain rice vermicelli in mesh strainer and flush with cold water immediately for 1 minute to stop cooking process. Put in serving bowl.

3. Arrange all your ingredients in the center of dining table.

4. In a bowl of lukewarm water, briefly soften 1 sheet of rice paper and allow excess water to drip off. Lay on your plate over hanging edge slightly.

4. Lay 2-3 shrimp on the rice paper on the end closest to you. Lay 1 lettuce leaf, assorted vegetables/meat and rice vermicelli on top of shrimp.

5. Fold wide edge closest to you over the top of the fillings and tuck under. Then fold in both sides. Continue rolling spring roll away from you until tightly rolled.

6. Serve with a variety of dipping sauces.

Dipping Sauces

-Nuoc Cham (Fish Sauce)
-Soy Sauce
-Hoisin Sauce
-Bean Dipping Sauce

Nuoc Cham Dipping Sauce

1 cup water
1/4 cup sugar
1/4 cup vinegar
1/3 cup fish sauce
1 tablespoon garlic, minced
2 thai chili peppers, cut in rings (add more chili peppers for more kick)

1. Boil water. Add vinegar and sugar and return to boil.

2. Allow it to cool.

3. Add garlic and peppers to mixture.

4. Add the fish sauce and combine.

*This mixture can be kept for several weeks in fridge.

Bean Dipping Sauce

1 1/2 cups water
1/2 cup hoisin sauce
1/4 cup bean sauce
1/4 cup plum sauce
1/4 cup sugar
2 tbsp peanut butter

1. In medium saucepan, combine first 5 ingredients and cook over medium heat until sauce begins to bubble.

2. Stir in peanut butter and remove from heat. Allow to cool before serving.

* A friend of mine makes a dipping sauce similar to this one with less water, hoisin sauce and peanut butter that is very tasty.

Our New Family Additions...

We have been promising M & M pets for the longest. I guess our fish just don't cut it anymore!

Fireman and I talked it over...and went back and forth...Dog vs.Cat...Dog vs.Cat....Dog vs.Cat...and we decided to adopt a kitten.

We took M & M to a local pet store who does adoptions on the weekend and checked out all our options. Then we saw a crate with the sweetest little 8 week old kittens you could imagine! We held several of them and Miss M had her heart set on this sweet shy little black kitten. And of course Mr M wanted a BOY and he wanted this little orange firecracker of a kitten.

Mommy is a sucker when it come to the twins so guess what....we adopted them both. Of course Mommy sweet talked the adoption fee down because I am super saving coupon mama!!


Meet Buddy and Batgirl, our newest additions!


Related Posts with Thumbnails